You’ve got a chip or crack in your windshield. You know it needs to be repaired. But before you book, you want to know exactly what’s going to happen what the technician does, what tools they use, how long each stage takes, and what the result looks like. That’s exactly what this guide covers. Whether you’re curious before your first repair or just want to understand the process you’re paying for, here’s the complete step-by-step breakdown of how car windshield repair works in Toronto.
1. How is a car windshield repaired? The complete answer
A car windshield is repaired by injecting a clear optical resin into the chip or crack under controlled vacuum pressure, then curing it with ultraviolet light. The resin fills the void in the outer glass layer, bonds the two glass surfaces together, and hardens to restore structural integrity. The repair stops the damage from spreading and in most cases makes the affected area nearly invisible.
2. Before the repair: what the technician checks first
Before touching your car, every professional windshield repair technician performs a pre-repair assessment. This takes about 5 minutes and determines whether repair is possible and which technique will be used. Here’s what they’re evaluating:
| Assessment factor | What the technician looks for | Why it matters |
| Damage size | Chip diameter vs toonie (25mm). Crack length vs 3-inch threshold. | Determines whether resin can fully fill the void. Too large = replacement needed. |
| Damage location | Distance from driver’s sightline. Distance from windshield edge. | Sightline damage = replacement. Edge damage = replacement. Both spread under frame pressure. |
| Glass depth | Whether outer layer only is affected, or inner PVB laminate is penetrated. | If the inner layer is broken, resin cannot restore structural integrity. Replacement required. |
| Contamination level | Presence of dirt, moisture, road salt, or previous DIY repair attempts inside the chip. | Heavy contamination prevents resin from bonding properly. Fresh damage gives the best results. |
| Damage age | How long the chip or crack has been untreated. | Older damage collects more contamination. Repairs performed within 48–72 hours consistently produce better optical results. |
| Chip type | Bullseye, star break, combination break, floater crack. | Different chip types require slightly different resin injection techniques and pressure settings. |
| If your damage passes all six checks: repair proceeds. If it fails any one of them, your technician will tell you honestly and explain why replacement is the right call instead. Wind Auto Glass follows a repair-first policy we only recommend replacement when repair genuinely cannot restore your windshield safely. |
3. The 7-step windshield repair process detailed breakdown
This is the complete professional repair process used by Wind Auto Glass technicians on every job. Each step exists for a specific reason skip one, and the repair quality suffers. Here is exactly what happens:
| Step 1 Damage inspection and assessment ⏱ ~5 minutes
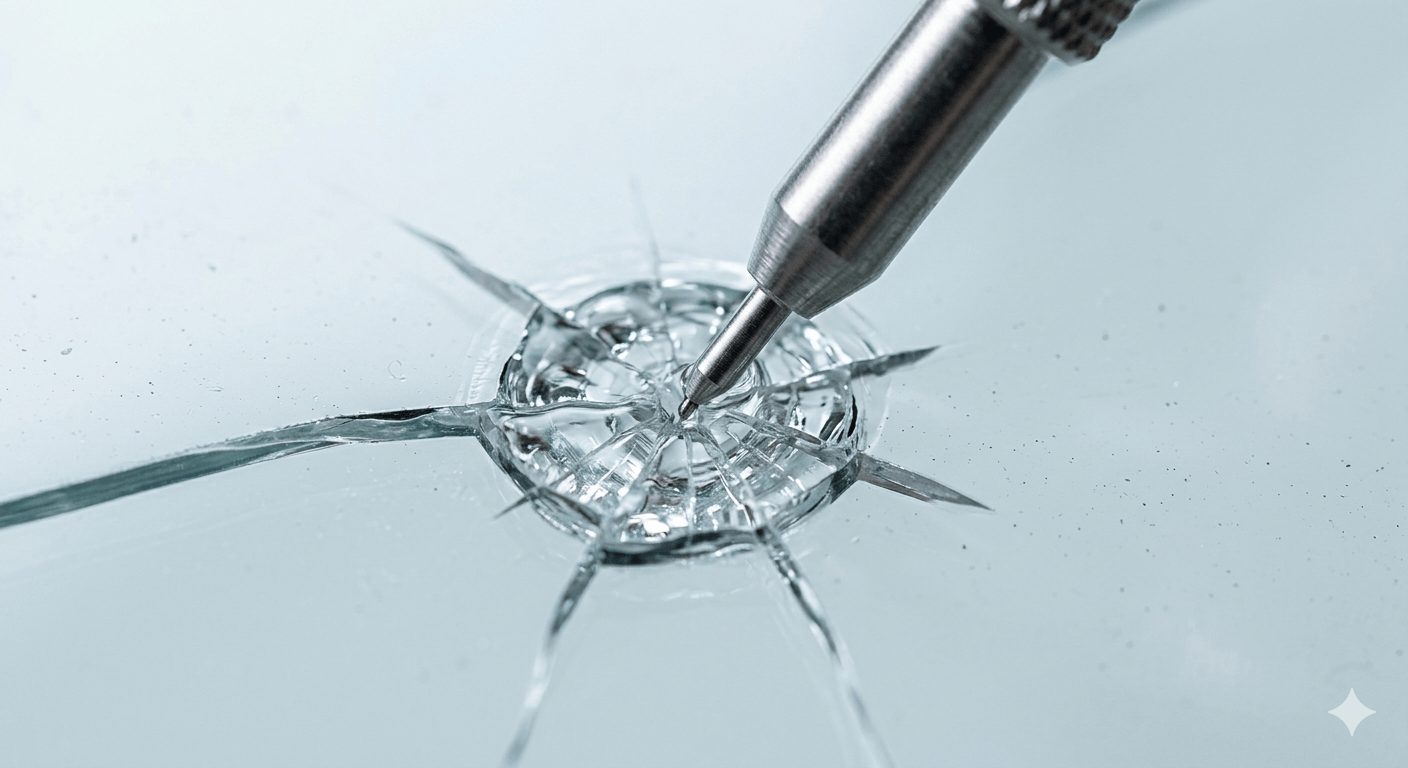
The technician examines the chip or crack under natural light and, where needed, a torch to assess size, type, depth, and location. This determines whether repair is viable and which resin formula and injection pressure will be used. What the technician does: Measures chip diameter, checks edge and sightline proximity, assesses glass depth with a pick tool, notes damage type (bullseye, star break, crack). |
| Step 2 Vehicle and area preparation ⏱ ~5 minutes
The interior dashboard and surrounding trim are covered with protective material. In wet or cold conditions, a heat lamp may be used to gently warm the glass surface cold glass below 5°C affects resin flow and UV cure time. What the technician does: Places protective covers over dashboard. In cold weather, uses heat lamp to bring glass surface to optimal temperature (15–25°C). Wiper blade at the chip area is moved clear. |
| Step 3 Damage cleaning ⏱ ~5 minutes
The chip or crack void is carefully cleaned using a combination of compressed air, pick tools, and cleaning solution to remove all dirt, debris, road salt, and moisture. This is one of the most critical steps any contamination left inside the void will prevent the resin from bonding cleanly with the glass. What the technician does: Uses compressed air to blow loose debris from void. Applies glass cleaning solution and works it into the chip with a fine pick. Compressed air again to ensure void is completely dry and clear. |
| Step 4 Vacuum stage air and moisture extraction ⏱ ~5 minutes
A vacuum-pressure injection tool is sealed over the chip using a bridge device that centres the tool directly over the damage. The vacuum setting is applied first, drawing out any remaining air and microscopic moisture from the void. This creates a clean, empty space ready to accept resin. What the technician does: Attaches injector bridge to windshield using suction cups. Centres injector tip over chip void. Applies vacuum for 60 to 90 seconds. Checks that void is fully evacuated before proceeding to injection. |
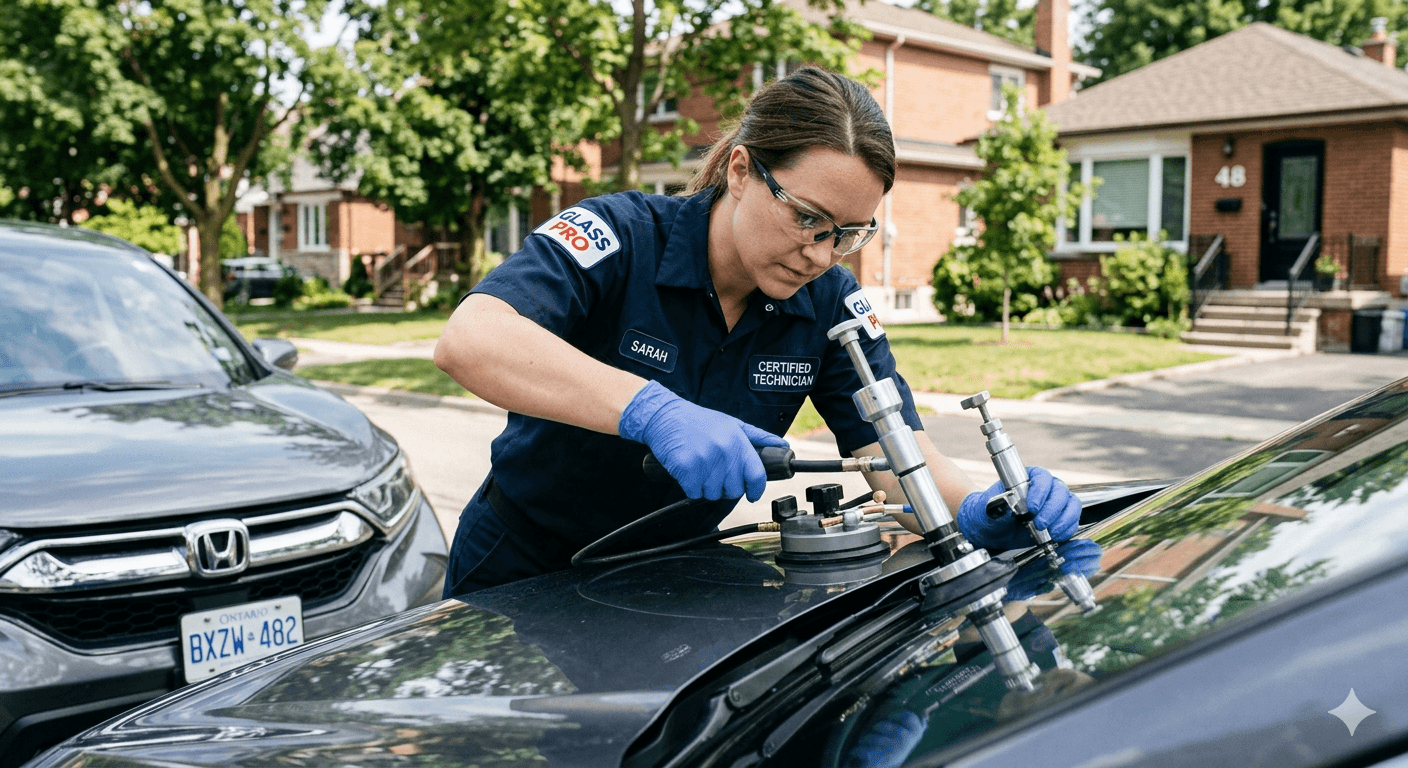
| Step 5 Optical resin injection ⏱ ~10 minutes
With the void evacuated, the injector is switched to pressure mode. Clear optical resin specifically matched to the glass type, temperature, and damage type is injected under controlled pressure into the chip void. The pressure forces resin into every part of the damage, filling the void completely including any micro-cracks radiating from the impact point. What the technician does: Switches injector from vacuum to pressure. Injects resin slowly and steadily, watching for complete fill. Cycles between vacuum and pressure two or three times to eliminate any remaining air pockets. Confirms void is fully filled before removing injector. |
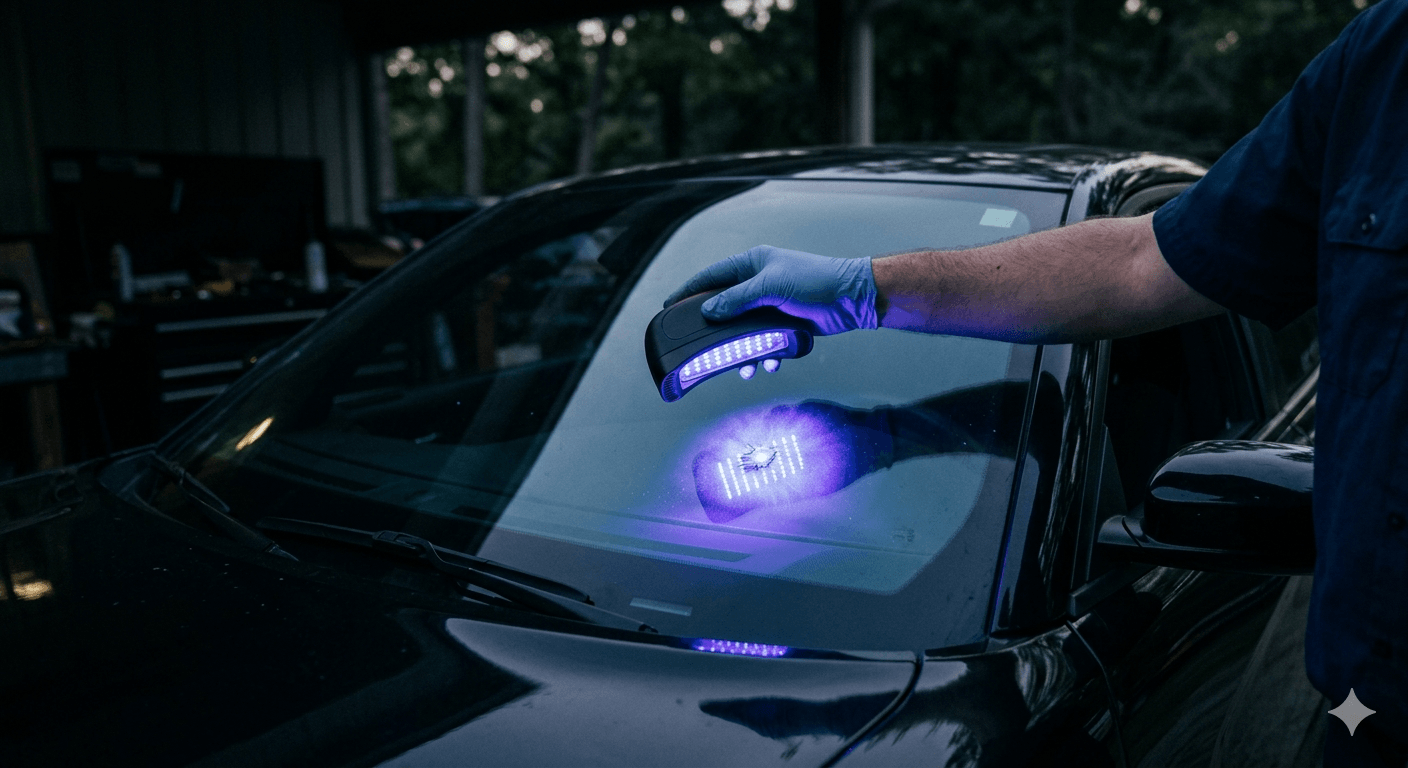
| Step 6 UV curing ⏱ ~10 minutes
A UV curing lamp is held over the filled chip for 1 to 3 minutes. The ultraviolet light triggers a photochemical reaction in the resin, hardening it from liquid to solid and bonding it permanently with the glass on both sides of the void. The cured resin achieves a hardness and refractive index close to that of the surrounding glass. What the technician does: Places UV curing lamp directly over filled chip. Cures for 60 to 180 seconds depending on resin type and ambient temperature. Cold conditions require longer cure times. Checks cure hardness before proceeding. |
| Step 7 Surface polish and final inspection ⏱ ~5 minutes
Any resin that has cured on the glass surface outside the chip void is carefully removed with a razor blade. The repair site is polished with a glass polish compound to restore optical clarity and a smooth surface finish. The technician performs a final visual inspection in natural light, checking that the chip is fully filled, the surface is smooth, and no air pockets remain. What the technician does: Uses fresh razor blade at low angle to remove surface resin. Applies glass polish to repair site and buffs with a clean cloth. Inspects repair from multiple angles in natural light. Shows the repair to the client before packing up. |
| Total time: 30 to 60 minutes from first inspection to final polish. You can drive your vehicle immediately after the UV-cured resin is fully hardened there is no wait time after a chip or crack repair, unlike a full replacement where adhesive must cure. |
4. What tools does a windshield repair technician use?
Professional windshield repair requires specific equipment that is significantly more effective than anything available in a DIY kit. Here’s what a fully equipped technician brings to your location:
| Tool | What it does | Why professional grade matters |
| Injector bridge | Holds the vacuum-pressure injector centred precisely over the chip void using suction cup mounts | Precise centring ensures resin fills the full void, not just the centre. DIY kits have no precision positioning. |
| Vacuum-pressure injector | Cycles between vacuum (air extraction) and pressure (resin injection) to fully fill the chip void | The vacuum-pressure cycle is what eliminates air pockets. DIY kits only inject they can’t evacuate air first. |
| Optical resin (professional grade) | UV-cured polymer resin matched to glass type, temperature, and chip type | Professional resins have a refractive index close to glass, making the repair nearly invisible. DIY resins are generic. |
| UV curing lamp | Triggers photochemical hardening of the injected resin | Professional UV lamps cure evenly and fully. Sunlight curing (DIY method) is inconsistent and often incomplete. |
| Pick tools and cleaning solution | Clean the chip void of debris, moisture, and contamination before injection | Proper void cleaning is the most underrated step. Contamination left by DIY attempts is a common reason repairs fail. |
| Heat lamp (cold weather) | Warms the glass surface to optimal temperature for resin flow and curing | Critical in Toronto winters. Cold glass below 5°C prevents resin from flowing into micro-cracks. |
| Razor blade and glass polish | Remove surface resin and restore optical clarity after curing | Produces the smooth, nearly invisible finish. DIY kits rarely include proper finishing tools. |
5. How long does car windshield repair take in Toronto?
Here are realistic time estimates for the most common repair scenarios. All are performed at your location across Toronto and the GTA no shop visit required.
| Repair type | On-site time | Drive away after |
| Single chip (bullseye, star break, pit) | 30–45 minutes | Immediately |
| Two chips (same appointment) | 45–60 minutes | Immediately |
| Three chips (same appointment) | 55–70 minutes | Immediately |
| Crack repair (under 3 inches) | 45–60 minutes | Immediately |
| Complex combination break | 50–70 minutes | Immediately |
| Repair in cold conditions (below 5°C) | Add 10–20 minutes for glass warming and extended UV cure | Immediately after cure confirmed |
| Toronto tip: Book your repair for mid-morning when temperatures are warmest, especially in spring and autumn. Extreme cold (below -10°C) slows resin flow and extends cure time. Our technicians carry heat lamps for cold weather jobs, but mild conditions always produce the fastest, cleanest results. |
6. What does the repair look like when it’s finished?
In most cases, a professionally repaired chip is nearly invisible under normal viewing conditions. After the resin is cured and the surface polished, what was once a visible chip becomes a very faint mark that is difficult to locate without looking for it.
Here’s what to realistically expect from different damage types after professional repair:
| Damage type | Typical result after repair | Important note |
| Fresh bullseye chip (under 24 hours) | Nearly invisible 90 to 95% optical clarity restoration | Best results come from fresh, clean damage |
| Star break (2–3 days old) | Very faint mark visible in direct sunlight invisible in normal conditions | The radiating legs may remain faintly visible at certain angles |
| Floater crack (under 3 inches) | Faint line may remain visible in some lighting conditions | Cracks show more post-repair evidence than chips this is normal |
| Old or contaminated chip (1+ weeks) | More visible post-repair mark, especially in direct sunlight | Contamination limits resin adhesion. Still structurally sound. |
| DIY kit attempted before professional repair | More visible result than a fresh repair | Previous DIY resin must be removed before professional injection adds time and affects clarity |
The primary purpose of windshield repair is structural stopping the damage from spreading and restoring glass strength. Optical improvement is a benefit, not the goal. A repaired chip that is faintly visible is still a completely successful repair. We’ll show you the result before we pack up and won’t leave until you’re satisfied.
7. What can go wrong and how to avoid it
Most windshield repair issues come from one of four sources. Understanding them helps you avoid them:
- Waiting too long. The single most common issue. Chips that are left for more than 48 to 72 hours collect moisture and dirt that prevents clean resin adhesion. In Toronto winters, one cold night can turn a repairable chip into a spreading crack. Book within 24 hours of noticing the damage.
- DIY kit attempts. Over-the-counter repair kits don’t use vacuum extraction before injection, which means air pockets remain in the void. They also use lower-grade resin without professional UV curing. A failed DIY repair makes professional repair harder and less effective. If in doubt, skip the kit and call a professional.
- Moisture in the damage during repair. Rain or dew on the glass during repair compromises resin bonding. Professional technicians check glass surface temperature and moisture before beginning, and will reschedule rather than attempt a repair in wet conditions without a covered location.
- Incorrect resin for the conditions. Resin viscosity needs to match the ambient temperature and chip type. Cold weather requires a lower-viscosity resin to flow properly into micro-cracks. Professional technicians carry multiple resin formulations DIY kits contain one generic formula.
8. Frequently asked questions
How is a car windshield repaired?
A car windshield is repaired in 7 steps: (1) damage inspection to confirm repairability; (2) vehicle and glass preparation; (3) thorough cleaning of the chip void; (4) vacuum extraction of air and moisture from the void; (5) injection of optical resin under controlled pressure; (6) UV curing of the resin to bond it permanently with the glass; and (7) surface polish and final inspection. The process takes 30 to 60 minutes and can be performed at your location anywhere in Toronto and the GTA.
Can I drive my car immediately after a windshield repair?
Yes. After a chip or crack repair, the UV-cured resin is fully hardened by the time the technician finishes polishing you can drive immediately. This is different from a full windshield replacement, where urethane adhesive requires a minimum 1-hour cure time before the vehicle should be driven.
How is windshield repair different from replacement?
Windshield repair injects resin into the existing damaged glass to restore it the original windshield stays in place. Replacement removes the entire windshield and installs a new one using urethane adhesive. Repair takes 30 to 60 minutes; replacement takes 60 to 90 minutes. Repair is free with most Ontario insurance policies (no deductible); replacement requires your deductible. Repair is always preferred when the damage qualifies.
Why does the repair still look slightly visible?
The primary goal of windshield repair is structural stopping the damage from spreading and restoring glass integrity. Optical improvement is a benefit, not a guarantee of invisibility. A repaired chip or crack may leave a faint mark visible in direct sunlight or at certain angles. This is completely normal and does not indicate a failed repair. The structural integrity of the glass is fully restored even when a faint mark remains.
What is optical resin and why is it used?
Optical resin is a UV-curable polymer specifically formulated to match the refractive index of laminated automotive glass. When cured, it is nearly optically identical to the surrounding glass, which is why repaired chips are difficult to see. Professional optical resins are available in multiple viscosities matched to different temperatures and chip types. They are not the same as the generic resins found in consumer DIY kits.
Does weather affect windshield repair in Toronto?
Yes. Cold temperatures below 5°C slow resin flow and extend UV cure time. Direct rain or moisture on the glass prevents clean resin bonding. Professional technicians carry heat lamps for cold weather jobs and will always check surface conditions before beginning. In very cold Toronto winters (below -10°C), our technicians will warm the glass surface to the optimal repair temperature before injecting resin. We will reschedule rather than perform a poor repair in unsuitable conditions.
How do I book a car windshield repair in Toronto?
Call Wind Auto Glass at (647) 345-5894 or use the online quote form at windautoglass.com/quote. Tell us your vehicle make and model, the type of damage, and your preferred location and time. We offer same-day mobile repair across Toronto and the GTA our certified technician comes to your home, workplace, or any convenient location at no extra charge.